Piere supports multiple data providers, also known as “aggregators.” Our two aggregators are MX and Plaid. Sometimes, Plaid may provide a better connection to an institution than MX, or vice versa. In this instance, you may want to change from one data provider to another to prevent frequent account disconnections. But what about your net worth history, transaction customizations, and historical data? That’s where migration comes into play.
With the migration tool that we’ll describe here, you can move your past account data easily from MX to Plaid, or from Plaid to MX. (Keep in mind, you will need to be a Piere Plus+ subscriber to connect accounts via both Plaid and MX.)
How to access the migration tool #
The migration tool can be found in two places:
- Navigate to the Institutions page and tap the action menu (3 dots “…”) to the right of the institution you want to migrate to a new data provider. We’ll refer to this institution as your old institution from now on.
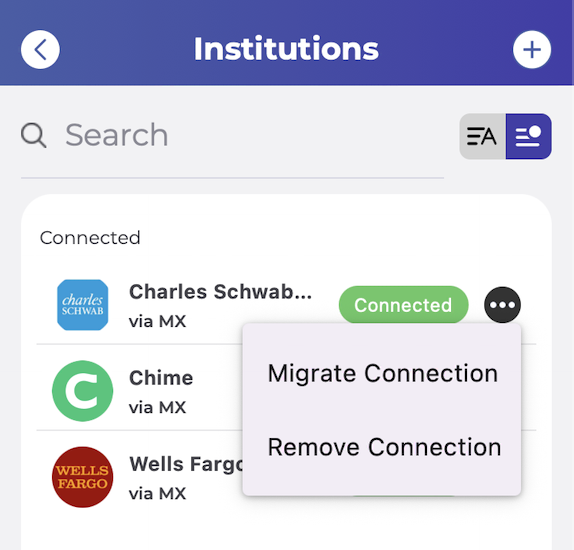
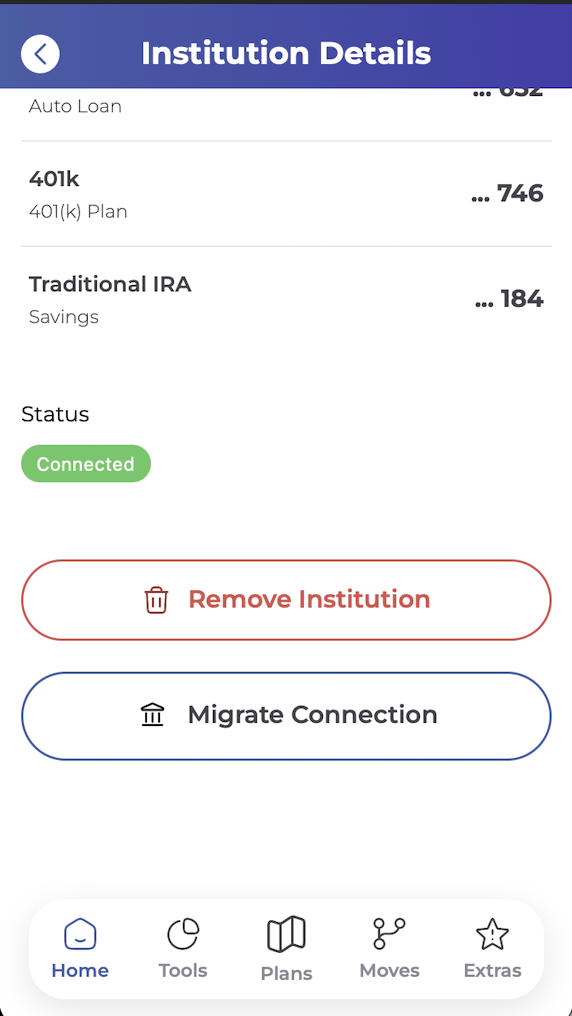
- You can also tap any institution from the Institutions page and find the migration tool linked at the bottom of the page. Tapping this button will begin the process of migrating to a new data provider. We’ll refer to this institution as your old institution from now on.
The migration process #
Select your new institution #
Once you’ve selected your old institution as outlined in the section above, you’ll select which institution will receive the migrated data from your old institution. Your selection in this step we’ll refer to as your new institution.
In almost every circumstance, the old institution and new institution should be the same: if you’re migrating from Charles Schwab connected via MX as your old institution, you’d select Charles Schwab connected via Plaid as your new institution.
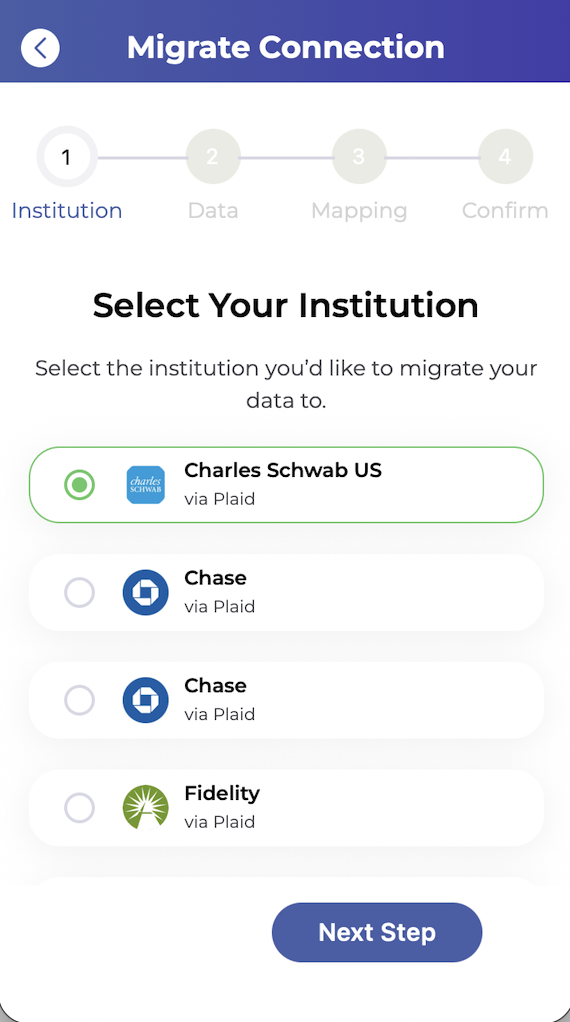
If your new institution isn’t yet connected to Piere, you’ll see an option to connect it at the bottom of this step.

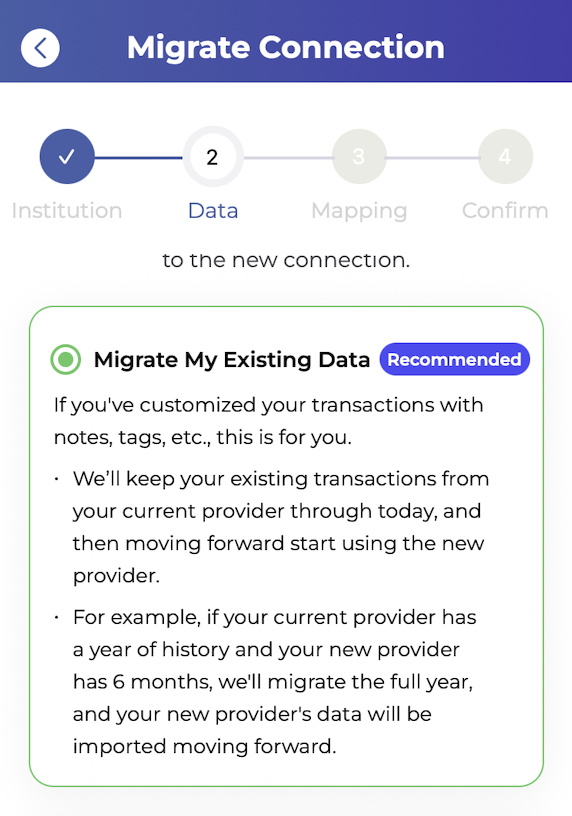
Choose what data to migrate to the new institution #
The following step will prompt you to decide what Piere migrates from your old institution to your new institution. There are two options that we’ll explain:
- Migrate My Existing Data
- This option is the most appropriate for the majority of cases. If you’ve previously added tags, notes, changed merchant names, etc., selecting this option will preserve that data during the migration.
- When you complete the migration, we’ll move all of your transactions and their customization from the old institution to the new institution, through the most recent transactions.
- New transactions will be populated using the new institution.
- Example: You have 1 year of history on Piere via your old institution connected via MX. You’re now migrating to a new institution via Plaid. We’ll move the entire year of transactions and data from MX to the new institution, up to today. As soon as the migration finishes, all new transactions and data will come from your new institution via Plaid.
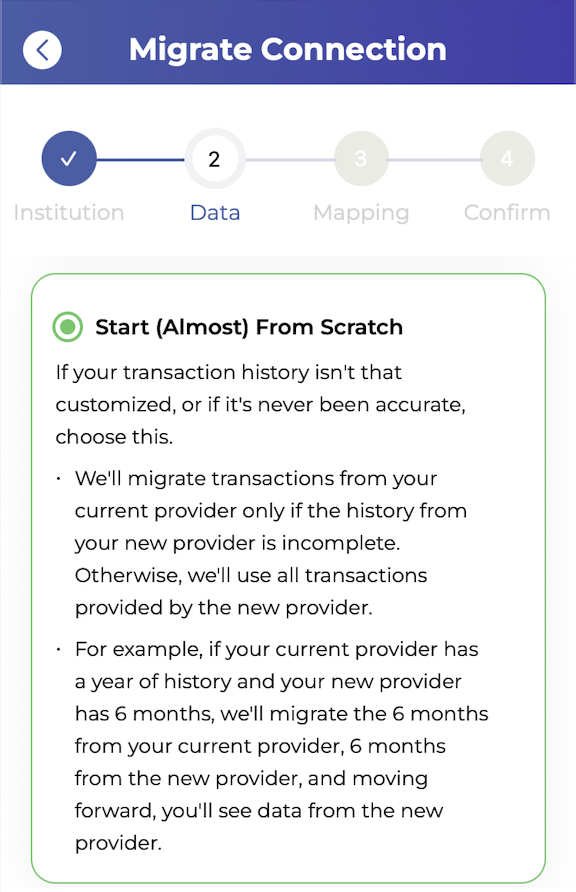
- Start (Almost) From Scratch
- This option is for data that’s not customized at all, or has hardly ever been accurate. If you want a completely fresh start in Piere but with a more stable connection, this is likely for you.
- When you complete the migration, we’ll import as much historical data as we can from your new institution, and use that to replace as much data as possible from your old institution.
- Example: You have 1 year of history on Piere via your old institution connected via MX. You’re now migrating to a new institution via Plaid. Let’s say Plaid has 9 months of account history. We’ll replace the 9 months of history from your old institution via MX with the 9 months of history from your new institution via Plaid. moving forward, all new transactions and data will come from your new institution via Plaid.
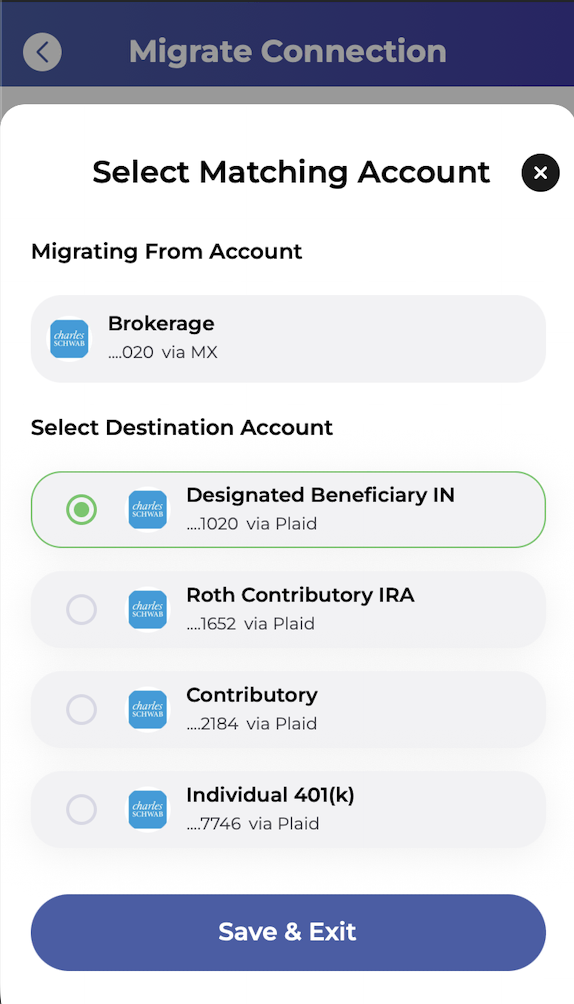
Map your accounts #
Now you’ve selected the old institution to migrate from, the new institution to migrate to, and what data you want to migrate to the new institution. The next step is to make sure we know which account(s) from the old institution match with which account(s) on the new institution. We call this “mapping.”
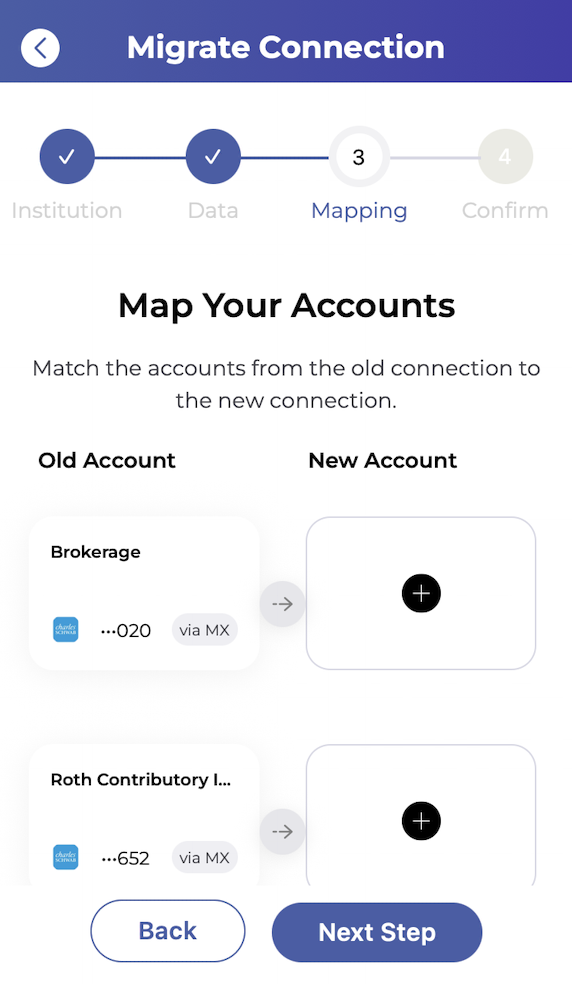
Simply put, you’ll make sure that the checking account Piere sees at your old institution is the same as the checking account Piere sees at your new institution. Start by tapping an empty square under the “New Account” heading and selecting the account that matches each “Old Account.”
Note: Pay attention to the last few digits of the account numbers to make sure you’re selecting the right account, since account names can differ between MX and Plaid.
What about closed accounts? #
If your old institution contains an account that’s been closed, you should not proceed with migrating the institution at this time. We will release a version 2.0 update of the migration tool soon that will have the ability to migrate closed accounts. Proceeding with migrating an institution that contains an old account, in this current version, will cause the closed account’s data to be lost permanently. In the meantime, to avoid duplicate data, we recommend hiding the accounts from your old connection.
Review your selections carefully and start the migration #
The final step is to review every selection you’ve made. If you notice any errors, use the edit (pencil) icons to return to the affected step to amend your choices.
Before clicking “Submit” to process the migration, ensure that the “Send Me a Backup” option is checked. We’ll then email you a link to download a backup of your old institution’s data for safekeeping. Note: You’ll need to download this data within one hour or it will be deleted from our servers.

How long does a migration take? #
Migrations can take up to 5 minutes to complete. During this time, you might still see old data. You can pull down to refresh on any page where updated data should appear to check if the migration has finished, otherwise, your data will update automatically once the migration completes.